Installing RMagick on Windows 7
In my efforts to install Ruby on Rails and SpreeCommerce on my Windows 7 laptop, the problem that stumped me the longest was the ‘spree install my_store‘ command that gave me the error:
'identify' is not recognized as an internal or external command,

operable program or batch file.

Image magick must be installed.
I tried running ‘gem install rmagick‘ first, which installed something, but it was still not sufficient to let me run the ‘spree install my_store‘ command without aborting in an error.
After much searching on Google and concatenating all these outdated sources, I finally figured it out. Steps (and troubleshooting details) are below.
Instructions:
- Install the Ruby DevKit if you do not have it already. Since I used RailsInstaller to install Ruby on Rails on my laptop, it was already included in the default directory ‘
C:\RailsInstaller\DevKit‘. Otherwise, find the .exe at the RubyInstallers downloads. To install,
Download it, run it to extract it somewhere (permanent). Then cd to it, run “
ruby dk.rb init” and “ruby dk.rb install” to bind it to ruby installations in your path. [source] -
Install a compatible version of ImageMagick on your Windows machine. The version that worked for me with Ruby v1.9.3v484 and Rails v4.0.4 was ImageMagick v6.7.7.9, 32-bit (direct download here). Supposedly, ImageMagick v6.7.9.9 is the latest version that will work. [source] For different archived versions, see here. The most recent ImageMagick v6.8.x gave me errors which made me go hunting for more troubleshooting instructions. If the ImageMagick installer hangs when you try to open it from your downloads folder, try right-clicking and ‘
Run as administrator‘.Make sure to install 32-bit even if you have a 64-bit machine. Installing the 64-bit version will make your
rmagickgem installation fail. [source]If you have a previous installation of ImageMagick, make sure to uninstall it first. If you can’t find the ImageMagick uninstaller in your ‘
Add/Remove Programs‘, check your installation folder (e.g.C:\ImageMagick) forunins000.exe. Deleting the installation folder will not properly remove all registry and path settings. [source]If you have a previous incompatible rmagick version installed, you can uninstall it using the command ‘
gem uninstall rmagick‘. Check for its existence with the command ‘gem list‘.Some notes about the installation process:
-
Install ImageMagick into a path with no spaces. The default ‘
C:\Program Files (x86)\ImageMagick-x.x.x‘ will have spaces. I used ‘C:\ImageMagick‘ to keep it simple.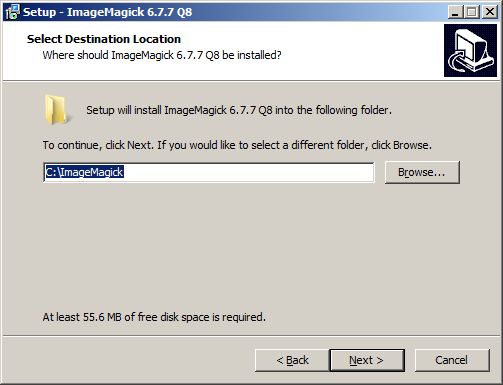
-
Select the options ‘
Add application directory to your system path‘ and ‘Install development headers and libraries for C and C++‘.
-
Make sure that ImageMagick is first in the path, or you may encounter an “Invalid drive specification” error when
extconf.rbtries to identify the ImageMagick version. [source] If you selected the ‘Add application directory to your system path‘ option from the previous tip, you should be fine.Otherwise, to double-check, go to ‘
Start‘ > right click on ‘My Computer‘ > ‘Properties‘ > left hand side for ‘Advanced system properties‘ > ‘Environment variables‘ button. In the ‘System variables‘ section, look for the ‘Path‘ variable and check that ‘C:\ImageMagick‘ (or the name of your ImageMagick installation directory) is first in the list.
-
-
Install the
rmagickgem. If you have a compiler in your command line, just use ‘cmd.exe‘ from your Start Menu. Otherwise, use the command line available in the DevKit at the default installation path ‘C:\RailsInstaller\DevKit\msys.bat‘.Run the command ‘
gem install rmagick --platform=ruby -- --with-opt-dir=c:/ImageMagick‘ and substitute the directory with your ImageMagick installation path if you named it something else. If you messed up and still left spaces in your installation path, use the command style ‘gem install rmagick -- '--with-opt-dir="[path to ImageMagick]"'‘ with the extra single quotes around the--with-opt-diroption and double-quotes around the path.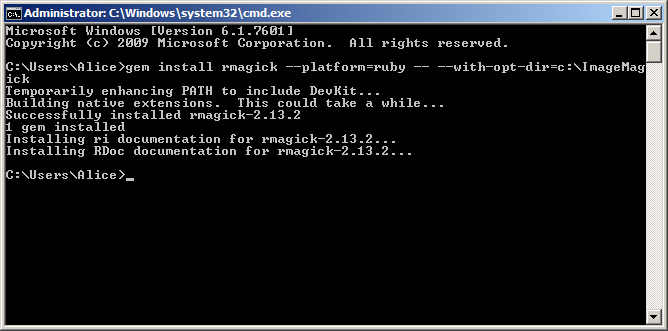
Success!
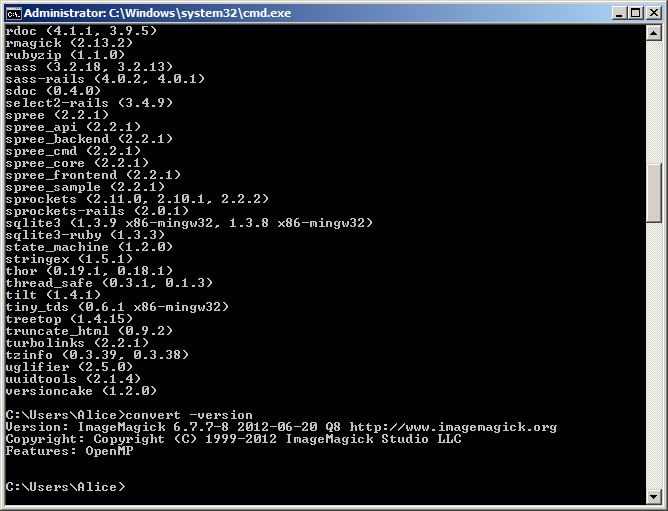
Double-check that RMagick has now been successfully installed by running ‘gem list‘ and looking for the rmagick gem or ‘convert -version‘.
May you have less frustration with these up-to-date (for now) instructions than I did!
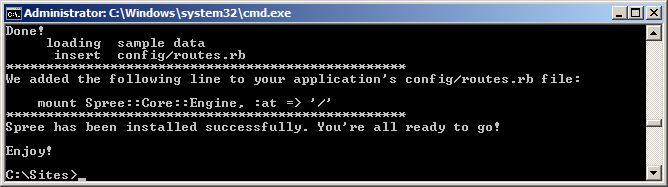
SpreeCommerce store installed!
June 6, 2014 @ 7:52 am
Thanks v much …. This has worked for me. It seems to have been the question around the Windows ImageMagic version where the compatability issue lay
🙂
July 4, 2014 @ 3:28 am
Thank you very much!
I tried so many ways to install it with no success.
I was about to give up n and found your tutorial.
February 17, 2015 @ 12:38 pm
Right on. I was having a very painful day until I found this help!
July 17, 2014 @ 6:22 am
Thank you so much!!! THis worked!!!
August 27, 2014 @ 3:00 pm
I followed the instructions and all seems well. However, there aren’t any demo product images. I also could not upload any images. But I did the command line convert and identify and verified that ImageMagick was installed and accessible. Any idea on what might have gone wrong?
Spree demo missing product images
August 27, 2014 @ 3:22 pm
[…] Additionally, I followed instructions on http://codeofalice.com/code/installing-rmagick-on-windows-7/ to install imagemagick and rmagick gems. No errors […]
October 29, 2014 @ 6:59 pm
Thank you!
November 4, 2014 @ 7:21 pm
How do I “cd to it”? I’m a newbie please help.
November 4, 2014 @ 8:18 pm
‘cd’ is the change directory command. When you open your terminal, you use the ‘cd’ command to navigate your current directory to the folder where you downloaded the file. If your file is in C:\ImageMagick, then you would use the command ‘cd C:\ImageMagick’ to navigate to the folder.
See more here: http://www.computerhope.com/cdhlp.htm
November 20, 2014 @ 1:52 am
Thank you very much..excellent instructions worked!!
December 5, 2014 @ 6:21 pm
Thanks for your nice tutorial. I came across it trying to figure out how to install rmagick. I have followed the steps for rmagick, and made sure to add imagemagick to the system path. I’m having this error when trying to install rmagick:
Temporarily enhancing PATH to include DevKit…
Building native extensions. This could take a while…
ERROR: Error installing rmagick:
ERROR: Failed to build gem native extension.
C:/Ruby193/bin/ruby.exe extconf.rb –with-opt-dir=c:/ImageMagick-6.7.7-Q
8
checking for Ruby version >= 1.8.5… yes
Invalid drive specification.
Unable to get ImageMagick version
*** extconf.rb failed ***
Could not create Makefile due to some reason, probably lack of
necessary libraries and/or headers. Check the mkmf.log file for more
details. You may need configuration options.
Provided configuration options:
–with-opt-dir
–with-opt-include
–without-opt-include=${opt-dir}/include
–with-opt-lib
–without-opt-lib=${opt-dir}/lib
–with-make-prog
–without-make-prog
–srcdir=.
–curdir
–ruby=C:/Ruby193/bin/ruby
Gem files will remain installed in C:/Ruby193/lib/ruby/gems/1.9.1/gems/rmagick-2
.13.4 for inspection.
Results logged to C:/Ruby193/lib/ruby/gems/1.9.1/gems/rmagick-2.13.4/ext/RMagick
/gem_make.out
Do you know how I can solve this issue?
Thanks a lot.
January 13, 2015 @ 2:20 am
Are you sure that you had it *first* in the path? I believe I had those error instructions covered in the tutorial.
Ruby on Medicine: Converting DICOM to JPG
January 12, 2015 @ 7:01 am
[…] Windows: Installing RMagick on Windows […]
July 4, 2015 @ 1:10 pm
It looks like the reason why the version of ImageMagick is so important is because the regex on lines 112 and 123 inside extconf.rb of the rmagick package no longer matches the version number format of later versions.
The regex is “/Version: ImageMagick (\d+\.\d+\.\d+)-\d+ /” and newer versions have a new format that has two dashes instead of one dash before the last number.
For example, “Version: ImageMagick 6.7.7-8 2012-06-20 Q8 http://www.imagemagick.org” vs. “Version: ImageMagick 6.9.1–6 Q16 x64 2015-06-20 http://www.imagemagick.org“.
November 5, 2015 @ 7:37 am
This actually worked! After trying and failing with a lot of other solutions, I tried this as a last resort and your instructions were perfect. I already had ImageMagick installed but it was too recent a version I guess – thankfully installing 6.7 did the trick (I didn’t actually have to remove my previous install, I just installed this in a different location).
Thanks again for your helpful post.
November 10, 2015 @ 12:19 pm
I’ve finally gotten it to work! In my course it just says “install ImageMagick” without further details.
Will I ever need to do this again? Otherwise I need to write it down
April 6, 2016 @ 10:02 pm
This is the only solution that worked for me. Thanks a lot. You saved my frustration.
April 16, 2016 @ 12:44 am
Finally it works !!
You saved my frustration. Thanks a lot !!
November 15, 2016 @ 5:44 am
Thanks for this. I was trying to get ImageMagick to work on my Windows 10 machine with rails and just couldn’t figure it out until I saw this. I got it to work with the latest version of ImageMagick (7.0 something) 64 bit by changing the path as you suggested. That was the main problem. If you are trying to install ImageMagick and make it work with rails on Windows, you no longer reed rmagic.